The baby sign language pain sign is made by extending both index fingers from fists and twisting them back and forth toward each other at the location where it hurts. This simple motion allows pre-verbal babies to communicate not just that something is wrong, but precisely where the discomfort is located””a critical piece of information that crying alone cannot convey. For example, a toddler with an ear infection can sign “hurt” near their ear, giving parents immediate insight into what might be causing their distress.
An alternative version exists for younger babies who lack the fine motor control for the twisting motion: simply tapping the extended index fingers together repeatedly. This simplified variation accomplishes the same communicative goal and is often easier for babies under twelve months to perform consistently. This article covers the exact hand positions and movements for teaching the pain sign, effective methods for introducing it during real situations, how to use the locational aspect to pinpoint discomfort, and common challenges parents encounter when teaching this particular sign.
Table of Contents
- How Do You Make the Baby Sign Language Pain Sign?
- The Simplified Pain Sign for Younger Babies
- Pairing the Sign with Spoken Language
- Common Challenges When Teaching the Pain Sign
- Using the Pain Sign for Non-Injury Discomfort
- The Pain Sign as a Communication Bridge
- Conclusion
How Do You Make the Baby Sign Language Pain Sign?
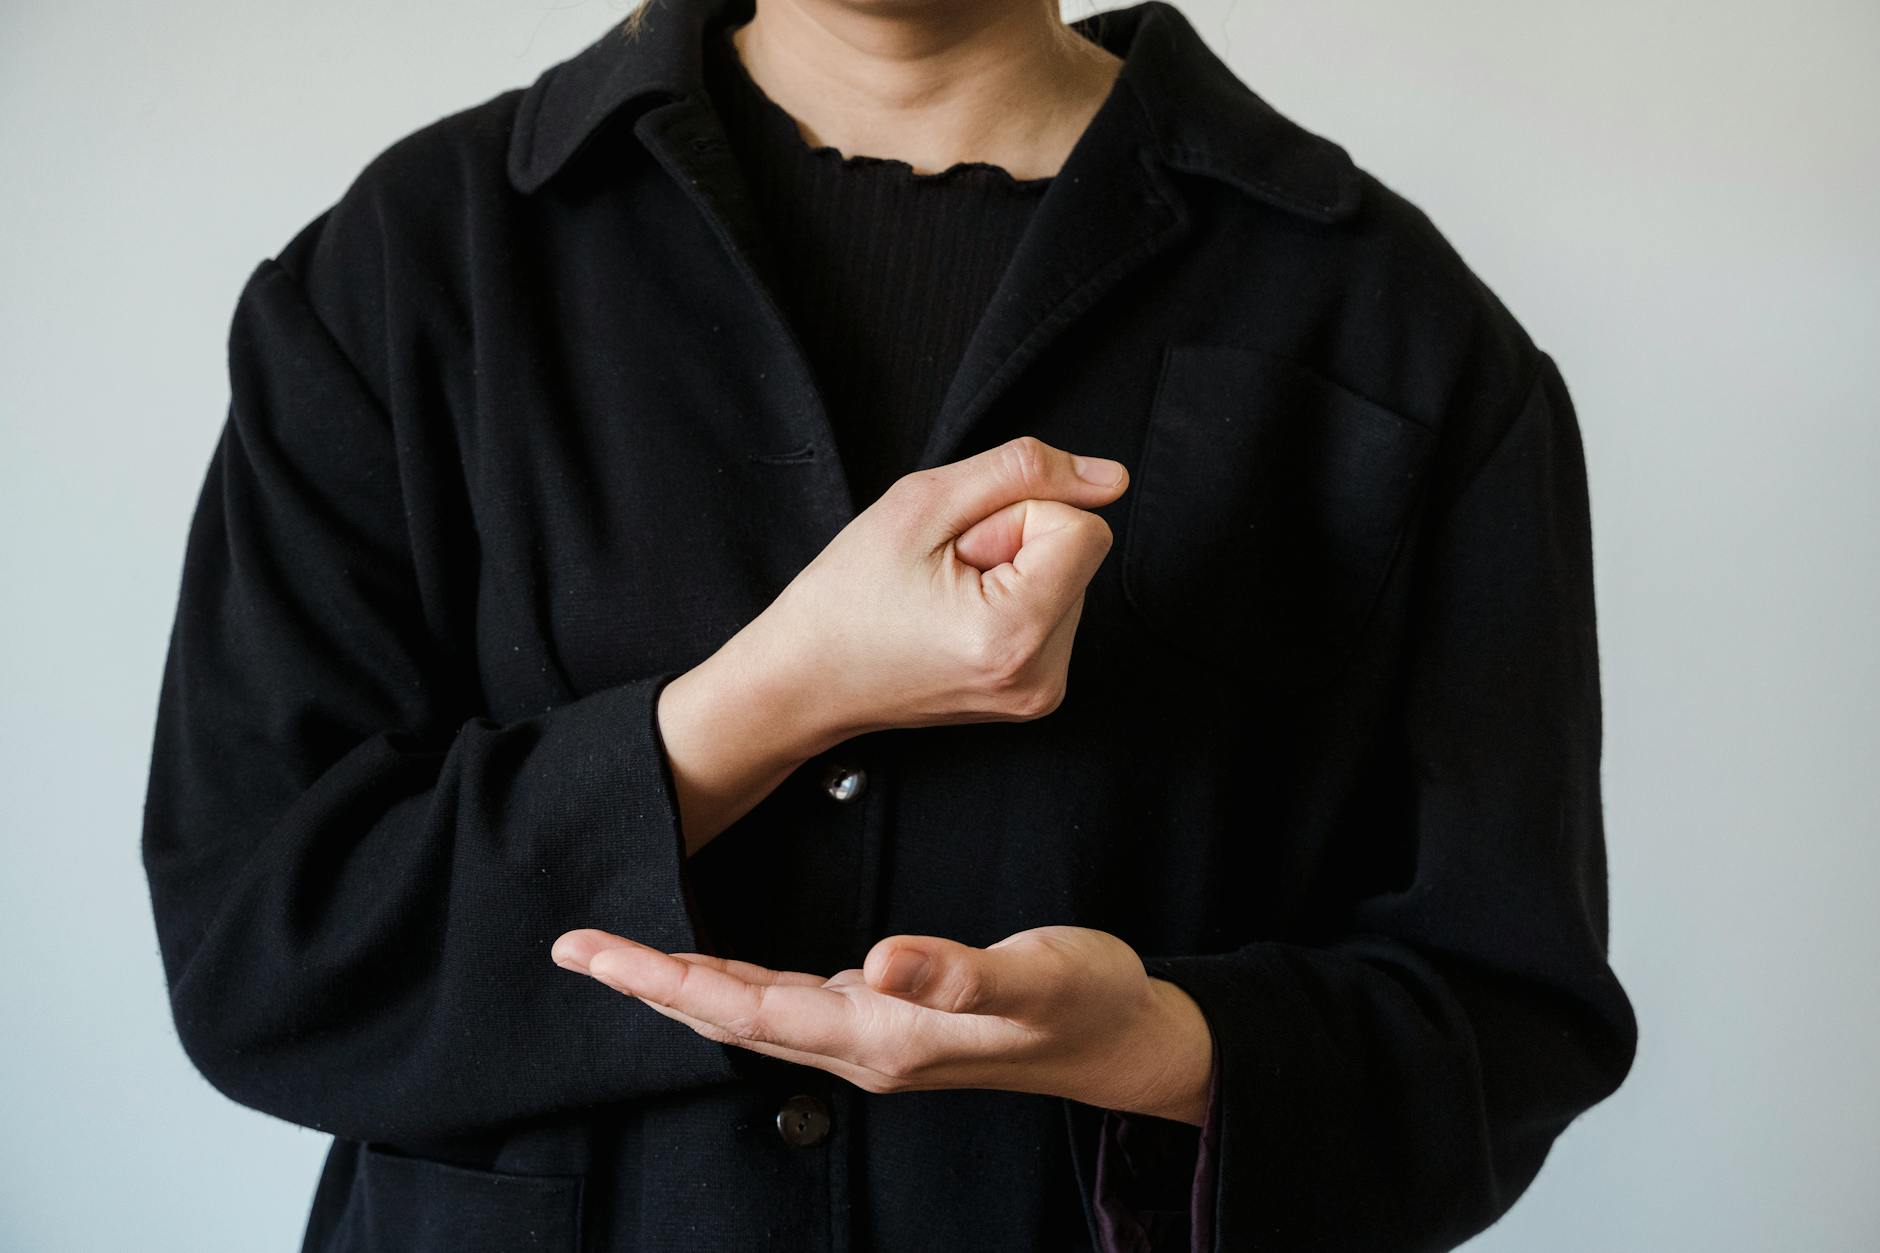
To perform the standard pain or hurt sign, start by making fists with both hands. Extend only your index fingers, pointing them toward each other so they nearly touch in front of your body. Then twist or rotate your hands back and forth in opposite directions, as if you’re grinding something between your fingertips. The motion should be deliberate but not exaggerated””think of it as a controlled alternating rotation rather than wild waving. What makes this sign uniquely valuable is its locational component. Unlike most signs that are performed in a neutral space in front of the body, the pain sign should be made at the site of the discomfort.
If your child’s stomach hurts, you sign over the stomach. If their head aches, you sign near the head. This dual-purpose design means one sign can communicate dozens of different ailments depending on placement. For comparison, consider how limiting it would be if babies could only sign “hurt” in a general sense without location. Parents would still face the guessing game of figuring out what’s wrong. The locational aspect transforms this from a simple distress signal into specific, actionable information.
The Simplified Pain Sign for Younger Babies
Many babies under ten or twelve months struggle with the twisting motion required for the standard pain sign. Their hands may not yet have developed the coordination for that rotational movement. The alternative””tapping extended index fingers together””provides an accessible entry point that still clearly communicates discomfort. However, if your baby learns only the tapping version, you may lose some of the locational benefit. Tapping is harder to perform precisely at a body location than the twisting motion is. Some parents teach the tapping version first, then transition to the twisting version as motor skills improve. Others find their children naturally evolve the sign on their own as they gain dexterity. Watch for approximations in either version. A baby might tap their whole hands together rather than just index fingers, or they might twist one hand while keeping the other still. These attempts should be acknowledged and reinforced””communication matters more than perfect form, especially in the early stages.
## When and How to Teach the Pain Sign Real-life situations provide the most effective teaching opportunities for the pain sign, though timing matters enormously. When your child visibly hurts themselves””bumping their head on a table corner, for instance””your first priority should be comfort and safety. Only after they’ve calmed down should you demonstrate the sign, saying “ouch” or “hurt” while making the motion at the location of the injury. Trying to teach during peak distress rarely works and may even create negative associations with the sign. Modeling the sign when you experience minor injuries proves surprisingly effective. Stub your toe and pause to sign “hurt” at your foot while saying the word aloud. Children learn extensively through observation, and seeing a parent use a sign in an authentic context reinforces both its meaning and practical application. Props offer another valuable teaching method. Placing Band-Aids on dolls or stuffed animals creates opportunities to discuss and sign “hurt” in a low-stakes, playful context. You might say, “Teddy has a hurt on his arm,” while demonstrating the sign at the toy’s arm. This approach allows repeated practice without requiring anyone to actually experience pain.
Pairing the Sign with Spoken Language
Every time you demonstrate or use the pain sign, pair it with the spoken word”””hurt,” “ouch,” “pain,” or “ow.” This pairing serves multiple purposes. It reinforces vocabulary development, ensures the sign doesn’t become a replacement for speech but rather a bridge toward it, and helps other caregivers understand what your child is communicating even if they don’t know the sign themselves. The tradeoff between using “hurt,” “ouch,” or “pain” comes down to consistency versus naturalness. Some parents prefer always saying “hurt” because it’s clear and consistent.
Others find “ouch” flows more naturally in the moment when pain actually occurs. Either works””the key is that your child associates the sign with the concept of physical discomfort, regardless of the specific word you choose. Be aware that grandparents, daycare providers, and babysitters may not immediately recognize your child’s sign. Brief explanations help: “When she taps her fingers together like this, she’s telling you something hurts.” Consider demonstrating the sign to regular caregivers so they can both understand and reinforce it.
Common Challenges When Teaching the Pain Sign
One frequent frustration parents encounter is that the pain sign requires pain to practice effectively, and obviously no one wants their child to hurt. This creates a catch-22 where authentic practice opportunities are inherently unpleasant. The prop method described earlier helps, but some children distinguish clearly between pretend scenarios and real ones. Patience is essential””this sign may take longer to establish than signs for “more” or “milk” simply because practice contexts are less frequent. Another challenge arises when children begin using the sign for minor discomforts or even fabricated hurts once they discover it gets attention. This isn’t manipulation in any sophisticated sense””it’s a natural consequence of learning that communication produces responses.
Acknowledge the communication (“I see you’re signing hurt”) while gently investigating whether actual pain exists. Over-reacting to every use may encourage unnecessary signing; dismissing it may discourage legitimate communication. Some children resist using the sign even after learning it, preferring to cry or whine instead. This is developmentally normal. Signing requires cognitive effort””remembering the sign, forming it, placing it correctly””while crying is instinctive and effortless. Continue modeling and gently prompting, but don’t force the issue during moments of genuine distress.
Using the Pain Sign for Non-Injury Discomfort
The pain sign extends beyond bumps and scrapes to communicate internal discomfort that parents cannot see. A child with stomach cramps from gas can sign “hurt” over their tummy. Teething pain can be indicated by signing near the mouth.
Headaches, ear infections, sore throats””all become communicable through this single sign combined with appropriate placement. For example, one parent reported that their eighteen-month-old began signing “hurt” near his ear repeatedly over several days. A pediatric visit revealed an ear infection that might otherwise have been dismissed as general fussiness. The sign provided specific, actionable information that changed the diagnostic process.
The Pain Sign as a Communication Bridge
The pain sign serves a temporary but valuable function: bridging the gap between physical sensation and verbal expression. most children begin using words for pain somewhere between eighteen and thirty months, depending on their overall language development.
Once verbal language takes over, the sign typically fades from use naturally, having served its purpose. Some families continue using a modified version of the sign even after verbal language develops, finding it useful in situations where speaking is difficult””during crying, for instance, or in noisy environments. The sign becomes less a necessity and more an additional tool in the communication repertoire.
Conclusion
Teaching the baby sign language pain sign gives your child a concrete way to communicate discomfort before they have words for it. The sign itself””index fingers extended from fists, twisting toward each other at the pain location””combines simplicity with specificity, allowing even young toddlers to indicate both that something hurts and where.
Effective teaching relies on real-life moments, consistent pairing with spoken words, and patience with the learning process. Comfort always comes before instruction when genuine pain is involved. With time and repetition, most children grasp the sign and use it to share information that crying alone cannot convey.